
It’s been a while since my last post consequentially this
blog will be considerably longer than previous posts. We last left off with me gluing
my cap on. First I flush trimmed my cap to the body. The next step was to route
for my control cavity. I chose to route out quite a bit mainly because the
mahogany body I used was very heavy (however the large pocket proved to be
useful in laying out electronic components also). I had to do two routes one
for the main cavity and one smaller route for my smaller upper cavity.


Then I began construction the neck. Preparing the
fingerboard is a crucial step if this is done poorly the whole neck shaping
process will suffer. I had to determine the exact taper, width and shape I wanted
before I moved on with any neck shaping.

Then I glued on the fingerboard. The first step is to find
the center line of the fingerboard and neck and line them up with the nut shelf
in the desired location. Then I drilled two holes, one at the 1st
fret slot and one on the opposite side in the 12th fret slot. Then I
coated the bits in wax and placed them in the holes this would prevent the
fingerboard from shifting any during the gluing process and it would also make
it extremely easy to reposition the fingerboard after applying the glue.


After doing a test run with cauls and cam clamps I taped off the truss rod slot and applied glue to the fingerboard. Then I let it dry for 2 hours before proceeding.
After doing a test run with cauls and cam clamps I taped off the truss rod slot and applied glue to the fingerboard. Then I let it dry for 2 hours before proceeding.


During clamp time I proceeded to do some sanding to my body,
everything needs to be sanded out to 240 before placing a round over or routing
a pocket for my neck. Any irregularities in the surface can cause problems
later on.
After the glue had fully set up I rough cut out my headstock
design.


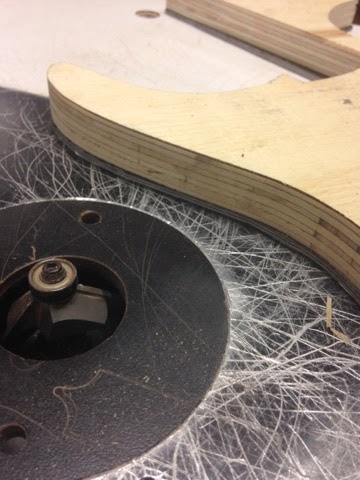
Then placed a template over the head-stock area and used a flush trim router bit to create a perfect copy of my template. At this point i glued on the piece of the fingerboard i had cut off earlier. I then created the traditional fender style “neck scoop” by using a spindle sander and a backing board. To do this I began to sand off material until I got the desired scoop.


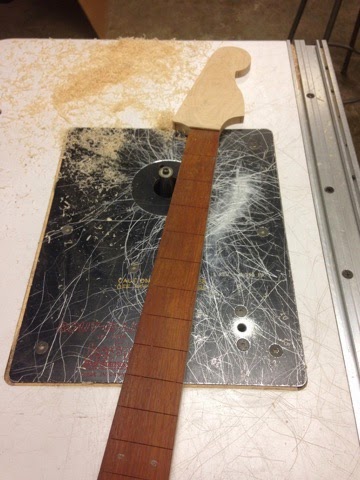
After I fine-tuned the headstock I cut off the excess material along the side of the neck and flush trimmed the neck. This is a very scary part of the build because at any point the router can tear out or catch at any point destroying the neck.


Then placed a template over the head-stock area and used a flush trim router bit to create a perfect copy of my template. At this point i glued on the piece of the fingerboard i had cut off earlier. I then created the traditional fender style “neck scoop” by using a spindle sander and a backing board. To do this I began to sand off material until I got the desired scoop.
After I fine-tuned the headstock I cut off the excess material along the side of the neck and flush trimmed the neck. This is a very scary part of the build because at any point the router can tear out or catch at any point destroying the neck.
I then radiused the fingerboard. I chose to do a compound radius
meaning that I would first start with a 9" radius at the nut transitioning into
a 12" radius at the heel.


I the used a hand drill to drill out holes for side dots.

After that it was time to hammer in the frets. I must admit that this fret job was the easiest I’ve done yet. I was so easy because I pre-bent the fretwire perfectly. Because the fingerboard has a radius to it the straight fretwire must be bent, however it must be bent past the radius to prevent a fret from popping up on the sides but not too much or it would pop up in the middle.

Many luthiers choose to glue frets in. A lot of times the glue of choice is super glue or cyanoacrylate glue, I've found that the less I can use of this the better. I chose to use some diluted Tight Bond. I brush glue into the slots and then hammered in the frets.
I the used a hand drill to drill out holes for side dots.
After that it was time to hammer in the frets. I must admit that this fret job was the easiest I’ve done yet. I was so easy because I pre-bent the fretwire perfectly. Because the fingerboard has a radius to it the straight fretwire must be bent, however it must be bent past the radius to prevent a fret from popping up on the sides but not too much or it would pop up in the middle.
Many luthiers choose to glue frets in. A lot of times the glue of choice is super glue or cyanoacrylate glue, I've found that the less I can use of this the better. I chose to use some diluted Tight Bond. I brush glue into the slots and then hammered in the frets.


Then I snipped the frets flush with the fingerboard edge and
filed a bevel into the ends of the frets. The rest of the fretwork (Leveling,
Shaping, etc.) will be done later.


With the neck being nearly complete I began making a
template to route my neck pocket. I did this by double-stick taping straight
plywood pieces around the neck heel onto another board. This would ensure the
best possible fit. I the rough cut the shape of my neck pocket and flush
trimmed the template with the bearing riding on the pieces I had double-stick
taped.
With my template complete I practiced a few routes on a
scrap board to ensure I had the best possible fit and correct pocket depth.
After a successful test route I clamped my template to my bass body and routed
out the neck pocket.


Then I laid out four ferule holes with a Forstner bit and followed this step by clamping the neck to the body and drilling for the neck screws.
Then I laid out four ferule holes with a Forstner bit and followed this step by clamping the neck to the body and drilling for the neck screws.

Since I decided to go with my own body design I could not
use a conventional pick-guard therefore I had to make my own. I made a template
from my blueprints. With this I bought some pick-guard material from Stew-Mac
and double-stick taped it to my template and used a beveled routing bit to cut
out the shape of my pick-guard.


After doing this I drilled and routed for my pickups and tone and volume knobs.
After doing this I drilled and routed for my pickups and tone and volume knobs.
I also had to create a cavity for my jazz style bass
pick-up. I did this in a two steps. The first step was to drill each corner of
the cavity because of the tight radius required in those types of pick-ups.
Then I plunge-routed the rest of the cavity. I then took an extra-long drill
bit and drilled a hole form the pick-up cavity to the control cavity.


The bass is really starting to take shape. See you guys for next weeks addition to my electric bass blog.

-John Potts